Making Your Own Kombucha: An English Student’s Journey into Biochemistry
Blob lives in a big jar. He is hidden inside a dark cabinet. He prefers it there. Blob may be the ugliest thing I have ever laid my eyes on. A cross between an alien planning Earth’s invasion and a brain floating in a glowing jar in a mad scientist’s lab. I am the mad scientist. The lab is my kitchen.
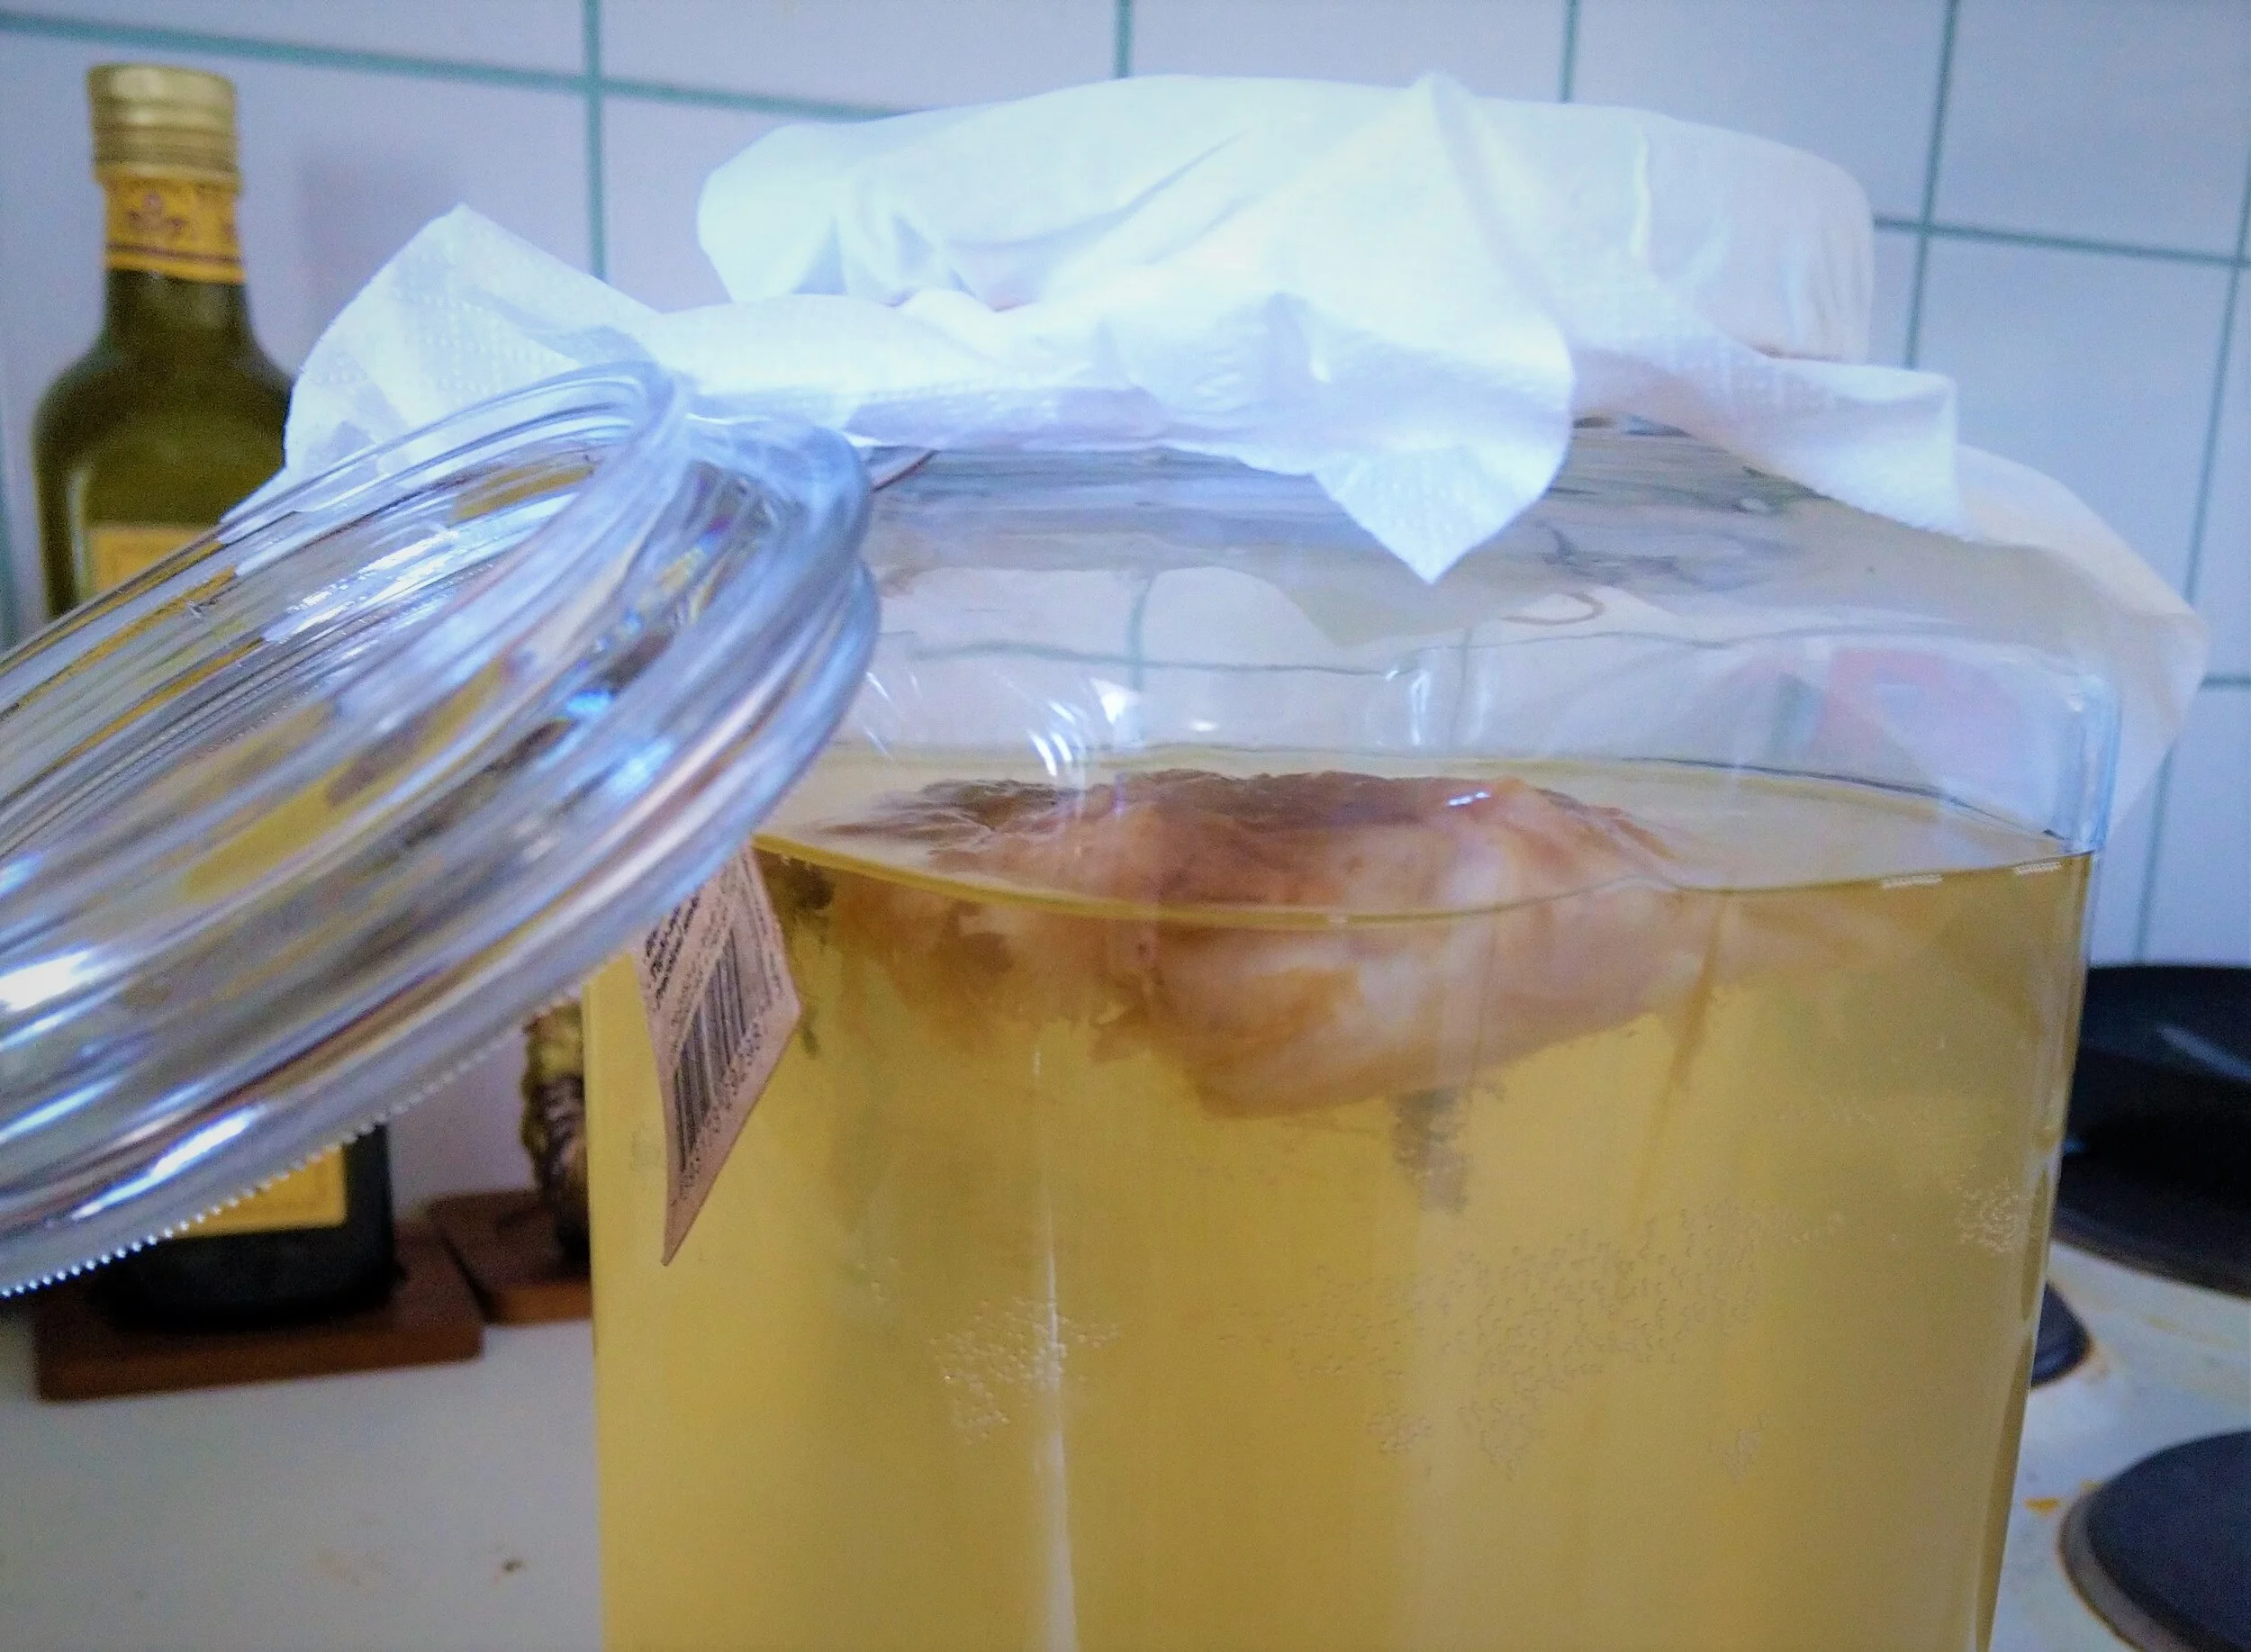
And this is Blob:

Blob is a SCOBY. That is an acronym for “symbiotic culture of bacteria and yeast”. Blob and other SCOBYs can be used to make a fizzy, sweet-sour drink called kombucha. Kombucha has become a trendy drink in many Western countries, but its roots are old, tracing back to China and Russia. It’s fermented tea that is claimed to cure basically anything from constipation to cancer. The health claim most likely to be true is kombucha’s possible probiotic benefits, but it’s also very likely that the only benefit is the refreshing taste.
A friend of mine got into making her own kombucha and decided to give me my very own SCOBY, as well. She has assured me that making kombucha is easy and cheap. Well worth the work and the wait. Looking at the weird lump floating in fermented tea she handed me left me feeling doubtful, but I decided to give it a go.
This is the story of me and Blob and my first ever batch of homemade kombucha. Stick with me and you’ll learn how to make your own kombucha as well!
Phase One: Get Yourself a SCOBY
The first step into making homebrewed kombucha is getting your own SCOBY. There are a few different options for this. You can either buy a full kit, go the hard way and buy a kombucha tea to grow your own SCOBY from there, or you might request one from an acquaintance who’s already into kombucha making. In any case, you need your own mushroom-alien-brain-thingie-wingie in order to make this delicious beverage.
You also need a bit of fully-brewed kombucha for making more. The general rule is that about 10% of the new kombucha batch should be already fermented. My friend says that she actually uses a bit more, maybe 4-5dl for a 3-litre batch. This can speed up the fermenting process and possibly help prevent mold. I don’t know if this is true or not, but as a newbie I’ll just follow my kombucha master’s advice for now.
Phase Two: The First Round of Fermentation
Starting your kombucha batch, you need a big glass jar, water, tea, sugar, a SCOBY and a bit of ready kombucha. You’ll find a more precise recipe at the end of this article, but in all simplicity you make tea and mix in the sugar and let it cool down before adding the SCOBY and the ready kombucha. Not too complicated even for people like me who consider making toast cooking, eh?
I had several types of delicious, richly flavoured teas in my kitchen, but I wanted something a bit more neutral for Blob so I bought jasmine flavoured loose-leaf green tea. The reason for this was that I intend to make more kombucha in the future and figured that something more neutral is better since I’ll be using a portion of this batch for the later ones. In the future, I might try the other teas that I have stashed away.
After mixing the ingredients comes the fermentation. Do not ask me how it works. Please. I am but a humble English philology major. All I need to know is that I have to store Blob and the sweetened tea somewhere dark that’s neither too hot nor too cold. I keep him there for around 7-14 days during which Blob eats most of the sugar and the tea starts becoming slightly carbonated.
You’ll need a big glass jar for the fermentation and please, please remember to cover it with something. The SCOBY’s natural enemy is the vicious, insatiable fruit fly. It’s summer as I write this which means that there are always fruit flies in my kitchen and they are very curious about Blob’s jar. I covered the jar with a napkin and tied it around the neck with a string so that the flies won’t crawl under it. Remember to use something that allows oxygen through, though, as your SCOBY needs it at this point.
While Blob was doing his job with the sweetened tea, I noticed a weird green-ish lump in the jar. I sent a photo to my kombucha master and she said it could be mold. I had been warned that there might be mold and advised not to panic. I’ve read that some people throw away the whole kombucha batch when they spot mold while others simply take the mold out. Since the lump didn’t seem too bad and it was floating on the tea, I did as my friend said and just cut it off Blob and threw it away.
Days passed and my kombucha kept on fermenting inside the kitchen cabinet. I’d taste it every now and then and witnessed the sweetness of the insane amount of sugar I had poured into the tea slowly fade away. The tea started to also get a little bubbly. I’ve read that some people talk to their SCOBYs during the fermentation the way others talk to plants. I haven’t gotten that far. Naming Blob is enough for now.
Phase Three: The Fun Part
After keeping Blob in his jar for 8 days, I got to the part I had looked forward to the most: adding the flavours. The more or less classic kombucha combo is ginger and lemon, but only the sky and your own imagination is the limit. Your more devoted kombucha makers will tell you to use everything organic and fresh, but if you want to try artificial flavours or whatever, I say you just go ahead. I’ll drink anything that has ginger in it so I wanted to try the classic flavour and since the time was perfect for blueberry picking, I went and also got some blueberries from a nearby forest and combined that with vanilla sugar.
For this part of the kombucha making, you need a glass container with an air-tight lid. Anything goes, I’m told. I was planning on using whatever old jam jars or whatnot I might find, but ended up buying actual glass bottles with caps as a treat-yourself purchase on a shitty day. This meant I also had to buy a funnel thanks to the bottles’ tight necks. My cheap drinks were starting to require more and more purchases, but in the future it’ll all pay itself back, I tell myself.

I put Blob and about 4dl of the kombucha safely away and then divided the leftover kombucha into three glass bottles. For the first one I used lemon juice of half a lemon and about 2cm long piece of ginger, for the second, handpicked blueberries and vanilla sugar, and for the third just ginger. If you want to be fancy like me and use glass bottles, remember to grate your fruits and berries into very small pieces so that they don’t block the neck. When you’re done, let the kombucha ferment for around 1-7 days until you’re happy with the taste and the amount of bubbles.

What to do with your SCOBY at this point then? I started a new batch of kombucha right away with Blob, but if you don’t want to have a constant kombucha factory going on, it’s also possible to store your SCOBY in an airtight glass container in the fridge or simply make a batch of sweetened tea and let the SCOBY grow there for a few weeks.
Phase Four: Enjoy Your Kombucha
I let my ginger kombucha ferment for 4 days during the second phase of the process and then kept it in the fridge for one day before curiosity got the better of me and I opened the bottle. It had a nice amount of bubbles by this point, but the taste could have been better. The first lesson learned: there’s no such thing as too little ginger. Next time, I’ll also try to have more patience and let the second fermentation go on a bit longer. It was nicely refreshing, though, so not a complete waste of time and resources. Three out of five stars.
More important than the ginger try-out were my ginger-lemon and blueberry-vanilla kombuchas as I had decided to take those to my mum’s so that the family can try them, too. Unfortunately, I had made the mistake of sharing pictures of Blob with my sister and she was unable to shake off the picture of the ugly lump floating in the jar. She did try the kombuchas, however, along with others. The blueberry one tasted mostly like juice. B-. The ginger-lemon one could have done with a bit more ginger and more bubbles, but it was my favourite of these three. Eight points from Finland.
Lessons that I learned from my first kombucha batch include using more flavours and being a bit more patient with the fermenting process in the future. I’ll have to try kombucha also without added flavours as I think this first batch might have actually tasted the best without anything in it.
Homebrewed kombucha recipe (3 litres)
2,7l water
2dl sugar
2-3 tablespoons of tea
A SCOBY
0,3dl ready kombucha
Put about one litre of water into a big kettle and bring the water to a boil.
Turn off the heat and add the tea.
Let the tea brew for 20 minutes.
Take off the tea (make sure there are no tea leaves left in the water) and add the sugar. Mix well so that sugar melts into the tea.
Pour 1,7dl of cold water into a big glass jar and add the sweetened tea. If you have a thermometer, check that the temperature is less than 30 celsius.
Add the SCOBY and the fermented kombucha
Cover the jar with a cloth, napkin or paper towel and tie it around the jar. Put the jar somewhere dark and keep it there for 7-14 days.
For the second round of fermentation, move the SCOBY and about 3dl of the kombucha into another jar and pour the rest of the kombucha into glass containers with airtight lids. Add flavours (fruits, berries, spices, herbs etc.) and leave the containers in the dark for 1-7 days. Open the lids once a day to let out the pressure as the glass might break otherwise.
Once the flavour seems good to you and the kombucha is carbonated to your taste, move the containers into a fridge. Share the kombucha with your loved ones and enjoy the fruits of your hard work!